引言
一直深受搭环境的困扰,今天鼓起勇气找蔡博讨论了一下,结果发现之前的方向其实是错误的,现在的任务其实是IDE的重新开发,只需要重新写个kernel,后端依然使用旧IDE的,因为以后平台需要跑在JDK8上,所以先看IJAVA kernel的代码,然后看一下怎么把kernel和现在IDE的后端连接起来.还有就是不能直接使用Jupyter的界面,要包个壳,起码要换个配色,#882929
今天跟蔡博聊过之后感觉…emmm,有不懂的问题真的要直接提问,赶紧问,不要怕丢脸,真的,不要端着,人笨就要多提问,我要赶紧改正太在意别人怎么看我的缺点,我天下第一笨,还有就是别人其实根本没想那么多,是我overthink,以后一定要做最笨的人+最不要脸的人,其实学长们都很好的
IJAVA Kernel 安装
(双)JDK安装
首先需要JDK>9的环境,我别的开发需要JDK7不想卸,参考⤵️
https://www.jianshu.com/p/913b5168ed6e
亲测好使,随时切换
IJAVA Kernel 安装
https://github.com/SpencerPark/IJava
有多种安装方式,我用的是Install pre-built binary
比较常用的安装选项是
1 | python3 install.py --sys-prefix |
因为我并不希望它依赖Python,所以使用了第二种方式.其实是用第一种然后又删了重装的
另一种安装方法使用 gradlew,会是我们自己编写的kernel使用的安装方式,见下一节
安装完成后,在命令行中
1 | jupyter notebook |
发现kernel选项中多了java的选择,可以输入一个System.out.println("Hello World")测试,然后Shift+Enter执行,发现打印成功就证明安装地没问题
JVM BaseKernel 使用
在GitHub上的源码地址👇
https://github.com/SpencerPark/jupyter-jvm-basekernel
实际上我们需要写的部分就是源码中example文件夹中的内容. 利用BaseKernel提供的一系列接口和自己language的接口,完成一个Kernel.
其实也不是需要全部自己写,直接对example进行修改就行了.所以先能够把examplebuild成功跑起来,就成功了一半(哈?give or take…🤷♀️)
官网的使用教程说在build.gradle中添加以下内容就可以使用BaseKernel了
1 | repositories { |
但实际上example的build.gradle也已经包含这部分内容了.而且也已经写好了安装的指令,执行下面指令
1 | chmod u+x gradlew |
就可以安装Kernel了
但是我在安装example的时候遇到了下面的错误
1 | Failed to execute: python3 -c "import jupyter_core.paths as j; print(j.SYSTEM_JUPYTER_PATH[0])". |
其实就是一条获取Jupyter Dir的指令python3 -c "import jupyter_core.paths as j; print(j.SYSTEM_JUPYTER_PATH[0])"没能执行成功,但是这个指令我在命令行是可以成功执行的,输出结果为/usr/local/share/jupyter. 因为报的错是EOL while scanning string literal所以可能是引号的使用有问题?我在整个BaseKernel的文件夹中搜索这条指令或者installKernel的指令都没有搜到结果,所以这可能是Jupyter的脚本中的?但是我使用同样的指令来安装IJAVAKernel就你没有报错.
查了一下gradlew是Windows版本的Gradle,可执行文件包含在了BaseKernel中,但其实它是个程序来着,用来执行gradl-wrapper
The gradle-wrapper is specific to every project and can only be invoked inside the project’s directory, using the command
./gradlew (arguments).
gradle是一个项目自动化建构工具.
- 差异管理:可实现静态级的差异控制,避免了针对不同设备产生的冗余代码
- 依赖管理:自动装载到~/.gradle/下,完成classpath等配置
- …
Gradle通过编写一个名为build.gradle的脚本文件对项目进行设置,再根据这个脚本对项目进行构建(复杂的项目也有其他文件)
BaseKernel直接提供给你了Gradle Wrapper
Gradle Wrapper 允许你在没有安装 Gradle 的机器上执行 Gradle 构建。 这一点是非常有用的。比如,对一些持续集成服务来说。 它对一个开源项目保持低门槛构建也是非常有用的。 Wrapper 对企业来说也很有用,它使得对客户端计算机零配置。 它强制使用指定的版本,以减少兼容支持问题。
通过查看(project's root folder=)example/gradle/wrapper/gradle-wrapper.properties发现这个project使用的是gradle 4.8.1,所以这里要注意不要用JDK11+(含),因为Gradle5才有了对它们的支持
后来上网查资料发现,这个installKernel是通过增加plugin实现的,源码在此👇
https://github.com/SpencerPark/Jupyter-kernel-installer-gradle
好吧,但对我找BUG并没有什么帮助…
- 不可能是真的EOL String 错误,因为这是个稳定可用的代码,且IJAVA中执行正常,所以排除了是这段代码的问题
- 只能对比BaseKernel和IJAVA的区别,可能是配置文件区别导致的 ✅
- 可以找一下Nachorn Kernel单独的源码包,进行安装 ❎
我对比了IJAVA和example的build.gradle文件,发现跟这个指令相关的一项设置
1 | installKernel { |
在IJAVA中有,而example中没有,在example中添加后,居然执行成功了!!!😱

(这里我截图的时候Jupyter连接已经断开了,不过你能看到是能够正常执行的啦,而且具有自动补全的功能)
妈耶,可以愉快地编程(改代码)了
IPython Kernel
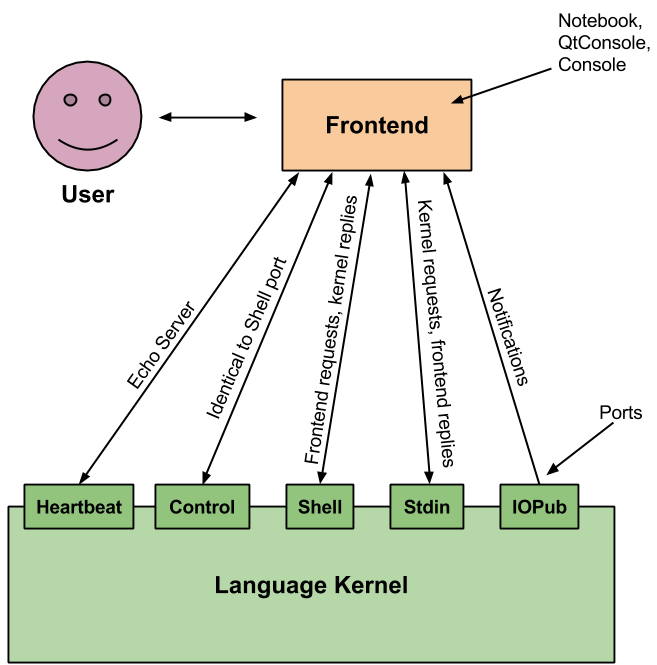
IPython提供了5个接口,与Jupyter前端页面进行信息交换;另外,Kernel背靠Python engine,将用户指令发给engine执行然后获取运行结果返回给用户.
(我浅显的理解,如果有误请纠正)

JVM BaseKernel
三种功能(位于BaseKernel.java,被子类YJSKernel重写):
- eval
- inspect
- complete
N种消息: 具有对应的HandleXXXRequest()函数,
- handleExecuteRequest() (调用eval函数)
INachornJS Kernel
JVM BaseKernel是一个提供了通信(messaging)和基本操作(还包括代码检查补全)功能的BASE(名副其实)
而example文件夹是利用这个Base实现的一个实际Kernel(INashornJS Kernel) ,其中起到功能作用的代码只有INashornJS.java和NashornKernel.java这两个文件(🤔看起来好像不难改)

INashornJS.java
主要是对文件进行检查,创建Handler,然后与Jupyter建立连接.
这个代码可以直接使用在新写的Kernel中
1 | package io.github.spencerpark.jupyter; |
NashornKernel.java
这个文件则是调用语言后端提供的接口,具体地实现了代码执行(eval函数),代码检查(inspect函数),代码补全(complete函数)三个功能
1 | package io.github.spencerpark.jupyter; |
MyKernel
Okay🙆,那下一个问题就是如何与后端通信.包含3方面的问题
- 如何import本地project
- 后端代码中提供了哪些函数接口
- 如何将这些接口变为engine(INachor)
修改Kernel Name
打算先把BaseKernel中的example改成我自己的kernel
- 整个工程文件夹改名,同时修改
settings.gradle中的根目录名 src/main/java/文件夹下io.github.spencerpark.jupyter.YJSmain函数所在的class改名在(build.gradle中Main-class改名)src/main/java/io/github/spencerpark/jupyter文件夹下两个文件改名,并修改文件中的类名- build.gradle中Jupyter字段中一系列Kernel name…改名
用Eclipse开发
因为项目是使用gradle编译的,所以现在本机安装gradle,因为BaseKernel使用的是4.8.1版本,所以我也使用这个版本.在
寻找想要的版本,下载后解压即可(下载二进制版本即可,完整版本包括一系列文档),然后将解压后的bin文件夹加入路径中
1 | export PATH=$PATH:/.../.../gradle-4.8.1/bin |
然后在eclipse中Help->Eclipse MarketPlace中搜索buildship并安装
安装完成后,使用import Project将Kernel工程导入进去,选择Exsiting Gradle Project(可能还需要配置一下你的系统Gradle路径?preference->data management->gradle 我忘记有没有配了)
工程中用到的依赖包括学长的整个工程生成的jar包yjs.jar,我的方法是在Kernel工程的build.gradle的dependencies字段加入.用Eclipse打开后,Build Path的Source中也自动包含了这个jar.
因为学长的jar就是整个SmartContract工程,所以按照在原来工程中的import方式,即
1 | import com.yancloud.sc.xxx |
应该就可以了,我看到这样调用在gradle build和Eclipse中都不会报错,但是很奇怪的,我用jupyter notebook并运行自己的kernel时,总是会在终端报
1 | Exception in thread "Shell-0" java.lang.NoClassDefFoundError: com/yancloud/sc/bean/Contract |
然后在前台的表现就是指令始终处于*运行状态,不会返回任何结果
因为是NoClassDefFoundError,所以我觉得应该是jar包根本没有调用到?那么编译为什么通过了呢?
https://discuss.gradle.org/t/gradle-not-compiling-dependency-jars-in-lib-folder/22186
这个问题好像跟我很相似,根据他的解答,在我的build.gradle中的jar部分添加了
1 | from configurations.runtime.collect { zipTree(it) }//添加runtime依赖jar |
然后终于成功了!感动😭
ContractManager 使用
ContractManager虽然包含在SmartContract下,但是可以单独运行,所以具有一个main函数(创建一个对象即可运行) 在我的
问题:学长的ContractManager是直接执行一个JS脚本;Jupyter Kernel是每次获取String类型的代码执行然后返回结果的String.并且我们还需要改jupyter的界面,所以应该直接改Jupyter Notebook
Jupyter Notebook 开发
1 | pip3 install --upgrade setuptools pip3 这句我其实没有执行,应该需要都改成pip3吧(新版本jupyter需要Python3) |
我执行npm run build指令后报错,原因是系统默认Python为2.7版本,而在Jupyter需要3.x,所以需要将这个指令修改为python3 …
可以通过下面这个指令查看npm可以执行的指令
1 | $ npm run |
npm是Node.js提供的包管理工具,它自动化得执行当前路径下的package.json文档中的指令(也就是上面查看到的),找到notebook中的package.json文件,将python修改为python3就可以了

然后就可以
1 | jupyter notebook |
运行你的开发模式的jupyter notebook了
(怎么确认你运行的是开发模式的而不是之前安装的普通用户模式的呢,在运行起来的jupyter界面中点Help->About->查看版本中是否包含dev)

可以看到包含dev,没问题了
Jupyter 架构
我的理解:
Kernel: IPython/YJS Kernel都是REPL(Read–eval–print loop),作为内核,执行代码
(我们使用第二种开发Kernel的开发,所以实际上与IPython完全是平行/无关的关系)
Jupyter 源码
Jupyter是基于Tornado框架开发的
tests文件夹下都是用来测试的JS脚本,执行
1 | python3 -m notebook.jstest # 测试所有JS脚本 |
第一次执行前需要安装依赖
1 | sudo npm install -g casperjs #phantomjs #slimerjs # 分别安装这三个 |
运行后发现有两个模块的测试不成功,报错如下
1 | Dengs-MacBook-Pro% python3 -m notebook.jstest |
selenium是找不到测试文件,mockextension是一直卡住被我强制ctl+C退出了.不知道是否是我这边安装的问题(也有可能是没写测试代码就不能测试,这个我以后再解决)
源码结构
我之前只用Django开发过一个比较简单的网页,主要都是按照教程follow the steps,所以并没有大型项目的开发经验.看到Jupyter Notebook的源码后,头很大😥连怎么找到需要的代码都不知道…所以打算不要着急,把基础知识补一补.
https://docs.python-guide.org/writing/structure/
这个网页比较好地介绍了Python工程应该如何布局
但是看完之后还是没法看懂Jupyter的代码结构,可能是因为Jupyter是网页编程,并且用了很多别的模块,项目比较复杂吧🤷♀️
网页编程的话,我想我其实只需要知道按钮的执行函数就可以入手了,想起我之前编Django框架下的Python程序的时候,是对每个行为def xxx,然后关联到一个对应的html网页上.Jupyter这个工程中我没有看到大量的html文件,可能是完全用No,在js取代了HTML? Correct me if I'm wrong!notebook/templates下!
CodeMirror
CodeMirror is a versatile text editor implemented in JavaScript for the browser.
在JS中可以调用,作为代码编辑框,可以设置显示格式,规定粘贴选型,实现代码自动补全等等功能
官方文档: https://codemirror.net/doc/manual.html#usage
Babel
Babel is a JavaScript compiler
Babel is a toolchain that is mainly used to convert ECMAScript 2015+ code into a backwards compatible version of JavaScript in current and older browsers or environments.
官方文档: https://babeljs.io/docs/en/
主目录下的./babelrc是babel的configuration file
Bower
网页的包管理器
Bower can manage components that contain HTML, CSS, JavaScript, fonts or even image files. Bower doesn’t concatenate or minify code or do anything else - it just installs the right versions of the packages you need and their dependencies.
官方文档: https://bower.io/
ESLint
用来编译JavaScript,提前知晓代码是否能够正常运行的工具
A pluggable and configurable linter tool for identifying and reporting on patterns in JavaScript. Maintain your code quality with ease.
JavaScript, being a dynamic and loosely-typed language, is especially prone to developer error. Without the benefit of a compilation process, JavaScript code is typically executed in order to find syntax or other errors. Linting tools like ESLint allow developers to discover problems with their JavaScript code without executing it.
官方文档: https://eslint.org/docs/about/
Travis CI
GitHub的辅助工具,push后自动检查代码是否能够正常工作
持续集成: Continuous Integration solution
Travis CI is a hosted, distributed continuous integration service used to build and test projects hosted at GitHub. Travis CI automatically detects when a commit has been made and pushed to a GitHub repository that is using Travis CI, and each time this happens, it will try to build the project and run tests. This includes commits to all branches, not just to the master branch.
AppVeyor CI
类似Travis CI,也是持续集成工具,跑在Windows上
CodeCov
有一个管理代码的工具,没仔细看了
Improve your code review workflow and quality. Codecov provides highly integrated tools to group, merge, archive, and compare coverage reports.
Python Egg
The
.eggfile is a distribution format for Python packages. It’s just an alternative to a source code distribution or Windowsexe. But note that for purePython, the.eggfile is completely cross-platform.The
.eggfile itself is essentially a.zipfile. If you change the extension to “zip”, you can see that it will have folders inside the archive.
已经确定源码都是在notebook文件夹下,那么下面就耐心地看一下每个文件做了什么吧…
_init_.py
如果需要建立一个python模块让其他地方可以导入并且使用,就需要有这个文件,主要是为了防止包的重名?Correct me if I'm wrong
可以在里面import xxx或初始化对象,这样整个包都具有了这些内容,但通常不建议这样做,容易造成冗余
The
__init__.pyfiles are required to make Python treat the directories as containing packages; this is done to prevent directories with a common name, such asstring, from unintentionally hiding valid modules that occur later (deeper) on the module search path. In the simplest case,__init__.pycan just be an empty file, but it can also execute initialization code for the package or set the__all__variable, described later.
_main_.py
通常Python都是直接执行一个.py文件如果想要直接执行一个包(文件夹),那么就会先执行_main_.py这个文件(后_init_.py再后其他文件)
修改Button功能
在
Chrome中查看jupyter页面的Elements,找到Run按钮元素的名字为run-cell-and-select-next
我的想法是,按钮一定会关联到一个函数(点击按钮执行Python的一个函数/js脚本),所以我在工程(notebook)中搜索这个button的名字,试图找到关联的函数
定位到了
notebook/static/notebook/js/action.js这个js文件中定义了一堆actions,并规定了它们的Handler,以其中一个action为例1
2
3
4
5
6
7
8'run-cell':{
cmd: i18n.msg._('run selected cells'),
help : i18n.msg._('run selected cells'),
help_index : 'bb',
handler : function (env) {
env.notebook.execute_selected_cells();
}
},所以如果我现在规定一个按钮的action是
run-cell,那么会调用的函数就是execute_selected_cells().我查看一下这个函数,发现有两个该函数的声明,分别在notebook/static/notebook/js/main.min.js和notebook/static/notebook/js/notebook.js我看了一下两个文件中的代码,好像差不多,
可能main.min.js是提供给windows执行的代码?而notebook.js是Xus执行的?